Sunday, May 3, 2015

Business Official!!

Welp, the time has officially come. I now have a business card, and an official website. This all feels kind of surreal, but also really freaking cool. Below is a link to my personal website, and images of my new business card. Short post is done, and I'm out for bed.

http://www.jaredbsneed.com/

Business Card Front


Business Card Back


Monday, April 27, 2015

Portfolio Pre-Production: Animation Exercises

Hello on and all! I'm back, after a little while, to update you on what I've been doing this last month. I will admit, I was a bit lazy when it came to working on my own stuff. Unlike my Directed Studies class, I had daily animation assignments to work on, PLUS having to create my own business card and website. In the new month I got a brand new animation mentor, and learned a variety of things. For this post I will be showing off a small portion of what we had to do, otherwise I would be showing off 15 different animations haha. So without further delay let's get started!!

Animation Exercises: Peels


Each week we had to do 5 different animation, all based off a concept. Week 1 was Speed poses, Week 2 was Takes, and Week 3 was Peels. A Peel, is when you show a hand or a foot, peeling off of a surface. We were shown lots of examples, but there was always something missing with each new example.... Personality. Every example showed only a hand and an motionless object. No story, no emotion, just a hand and a table or pole. I chose to do something different and add in my own humor. Now the animation of the man in the orange shirt is not the focus of the exercise, the hand is. I just thought that the guys reaction was hilarious when his lip gets touched haha


The next peel I did was mimicked off of me, and my natural habits or ticks. I often touch my face, or more specifically, stroke my beard without even noticing it sometimes. I cant help it, it's just so soft! But I figured I'd want to practice a character touching their own person and see how it went. I could have done more animation on the rest of the body, but never got around to it.


And here we are on the final exercise that I will show. After spending time do hand peels, I wanted to try my hand (pun totally intended) at a foot peel. The original thought was to get across a more shy, or bashful girl, and getting that emotion across with just her feet, but it was just out of my skill level. I was trying to have her swivel on her toe, like she was talking to a crush, but couldn't get it looking right. It made me mad that I had such a clear idea, but couldn't replicate it. But I think it's important to show what I would consider a "failure", so that I can show that I know how to move past it, what I can learn from it.

Well that's pretty much it for this post. I have more things I could show off, but don't want to bore you. Hope to see you again, for my next update!

Tuesday, March 17, 2015

Who's that?!

Short post today. As a Character Animator I'm always looking for new animation rigs to use. To me it's like Christmas, every time I get a open a new rig, I don't know what it is about it. Either way I never feel like I have enough variation in the rigs that I currently have, so I took to modifying one of my favorite Rigs.
“Malcolm character courtesy of AnimSchool.com”
So here we have the AnimSchool Free Rig, Malcom. I personally love the way this looks, but I it's hard to find another rig that fits the same style of this particular character, so I took it upon myself to modify this base Malcom Rig to fit my needs.


So here it is! This is the modified Malcom Rig that I made. I took some new geometry for the hair, and scaled some of the controls in order to change the shape of the face. It can be a little tedious to use, seeing that I can't zero out certain values, but it works for what I need him to do....and I'm really happy with it, so isn't that all that matters?

Anyways that's all for today, I hope you're all doing well.

Thursday, March 12, 2015

Directed Studies: The Sneeze

Oh man, it's been quite awhile since I've been on here to update you all on my progress through Full Sail. I have been fairly busy with school work and personal projects and just haven't even been able to think about updating this blog. I never really meant to, but sometimes you have to put some things on the back burner. Oh well haha

Well this time I'm showing off an animation I had 15 days to work on. If the title didn't give it away already, I had to animate a character sneezing. So without further delay, here is my progression through my animation.

Directed Studies


This was the first draft that I was able to get done in about 10 hours. I was proud of it at first, but quickly realized how much was wrong with it, after I took a step away from it. I learned a very valuable lesson that day...Step away from your work every so often. Nothing is worse than getting tunnel vision, and not being able to see faults in it anymore.


After some critiques from my mentor, I started to change up my animation and add some more personality to the character.  There was still a lot of things wrong with this version, that I fixed up for the final, but as you can see here almost the entire animation has changed.


And here we are. This was the final animation that I turned in for a grade. Again there was still a lot wrong with this animation, but I learned SOOO much from my mentor, and drastically changed the way I work in Maya. This month was very valuable to me, as a student, and can't wait to see what else is waiting for me later on.

Tuesday, January 20, 2015

Animation: Stewart Run Cycle #1

Hello all, Jared back with another animation for you all! Today I pulled out this quick and dirty run cycle, in order to get to know a new character rig. There are many things that are wrong with the cycle, yet I didn't feel like modifying it anymore. I was happy with where I got, even though I know it's breeding bad habits when I do things incorrectly. The problem I had was that I was so excited to play with my new Rig, that all logic went out the door haha Seriously getting a new rig is like getting a new toy for your birthday, all you want to do is play with it all day long.

Blocking Stage


Like always here is the initial blocking stage, with the inbetweens already placed in. I kind of just did everything at once, and didn't work like I normally would. I personally found that this way worked pretty well for me, at least for this kind of animation. I don't know if I will use it again, but it's definitely something I'll consider.

Auto Tangent & Cleanup


So here is the final piece, overall it is rough, and I know that. I didn't get the right rotations on the torso, and the arms and legs could be moving a lot smoother, but for the 2 hours that I worked on it I was fairly content with it.

Once again I learned from this project, and can't wait to work on more.

Sunday, January 18, 2015

Animation: Zombie Walk Auto Tangent

Welcome back everyone! Jared here and I this time I want to update you on the Zombie walk that I posted last time. I was able to work on this walk a bit more, and you'll see some significant improvements, or I guess for some it may just add on to the list of "Things that are Wrong". Either way, I'm having fun, and that's what this is all about. NOW ON TO THE UPDATES!!!!

Back to Blocking?!


That's right I went back and added a bit more to this animation. I felt that the original two steps was not enough, so I added on two more. That's why the end is in blocking, while the begining is still auto tangent. If you look at the first part of the walk you'll notice that I did a fair bit of work on it, by tweaking the dragging foot, and the left arm. I felt that having it up all the time, made it look too much like it was Heiling Hitler, and that's not good, so I made it look like the zombie was reaching out for it's target. Honestly I think it add a bit of a story to the character.

Auto Tangent 2.0


Okay so I quickly realized, after I switched the animation to Auto Tangents, that my timing was a bit too fast. You can see how the character speeds up half way through the animation. To me that's not really something that would happen in the "real world" so it needed to be fixed. Oh I also forgot to mention that I worked with the hands a bit more, so that they would actually look like they are grabbing something, instead of just being stiff.

Tweaking


Okay so here it is, the point where I'm probably going to call it quits. I worked on this project for 6-7 hours. It was only ever meant to keep me busy, and work on doing something different. I learned a few things here and there, and am fairly happy with the end product. There is still sooooo much that I could do to make this look 1000 times better, but I would rather move on to another small animation, and see what I can learn from that on.

Until next time!

Wednesday, January 14, 2015

Animation: Zombie Walk Blocking

Hello everyone, Jared here, and today I want to share a simple animation that I have been working on for the last few hours. Now this is nothing special, it was just an exercise to keep my imagination and skills up. In the next month or so I have to take an art test, and then I will be spending a few months on my Animation demo reel. Oh boy, this time at school has been crazy fast, and soo much fun. But enough about that. We are here to talk about Zombie walks!

Blocking Stage


So this is the first wave of Blocking out the animation. This was the result of 2 or 3 hours of work, including working out simple thumbnails....huh, I really should show off the thumbnails that I used, but to be honest I am really lazy, and don't want to deal with that. It sounds like too much of a hassle haha, sorry >_<

Auto Tangent 1


The ONLY reason why I am posting this up is because I have a lot of family and friends who are not animators, and have a hard time seeing things working out when my animations are in stepped. I know it's not a good showcase of skills, mostly because I have not tweaked any of this animation. There are no holds, no anticipation...nothing.

It's tough right now, but I will update this post as I continue to work on it more. Hopefully I will be able to show you a finished walk, or cycle, very soon. Keep an eye out for the updated post!!

Compositing and Scene Finishing: The Helmet

You know originally I was not going to post anything up about this class, but I figured that I would end up regretting it in the future. So here we go!

The second class I had to take in December was Compositing and Scene Finishing. This class is just a continuation of the first Composting class that I took waaaaaaaay back when, where I learned some of the ins and outs of The Foundry's Nuke. For this class our teacher was entirely overworked, and stressed. He was very lenient about our projects and grading, so there is not really too much to show, or that I want to show. One thing that I was happy about, was our second project, The Helmet Project. For this one we were tasked to take a live action reverence of a girl, and overlay Maya lambert armor overtop of it. There was a bit of freedom to this project, but not all that much. We had a target that our art director wanted us to hit, and we couldn't stray too far from it. It was to mirror a real life way of working in a studio, where we don't have control.

Helmet Project


So here we go! It was a small clip to work with, but it took forever to work on with our school laptops. Every time I would add a new node into the Nuke script, my computer figuratively make an audible groan of displeasure. I felt bad for it, she clearly wanted nothing to do with all of this. haha So the freedom that I was talking about before are some of the more subtle things in the shot. For instance the color of the helmet HUD, the pattern of the armor, and finally the background. Those three things were simple things that we could stretch our creative freedom over, but it was enough to keep the class interested in watching `8 of the same scene, during our critiques.

I'm glad that in our shortened month of December, our teachers didn't overload us with work, because it allowed me to have fun with our projects more so then I would have if we were constantly rushed to get our projects done.

Visual Effects 2: The Flame Demon

Okay so I know this is essentially just a repost of one of my others, but I have a reason for doing this. At school we are required to make these blog posts at the end of each months classes. Now normally this would not be a problem, in fact I have really found that I love updating my work onto this site...the problem that I had in December, was that I was so excited to go on my winter break that I kind of just put up a garbage post, which would get me the necessary points for my class. I kept on meaning to update this, sometime over my break, but every time I thought of it something would come up and I would forget about the blog. =/ Well now that I remembered the blog existed I am back to update the last post the way that I originally MEANT to do it. haha

Visual Effects 2 
So now onto the meat and potatoes of the post. Normally December is supposed to be a hell month at Full Sail, but I have to say 2014 was sooooo much easier than it was in 2013. My teachers were pretty overworked, tired, and ready for a break that they eased up on our assignments haha The class that I have the most work to post for is my Visual Effects 2 class. If you remember the first Visual Effects class that I took I had to use dynamics, and particles to create my effects, but for VEF2 we were delving more into the fluid effects of different programs. The assignments themselves were pretty open ended, as long as they used some sort of fluids, so with the freedom in place I went about thinking of an idea. It wasn't too long that I thought of something I wanted to try my hand at. Now I am in no way a Visual Effects artist, but I try to take pride in my work, and don't like when things come out looking like garbage. So for this project, after much thought, I choose to use a free rig, made by Justin Kirk, and revolve all my effects around the rig. 


So this was the first turn in that I did, for the class. After downloading the rig, I animated it to have an idle animation. In my mind there, was no reason to put the rig in there if I wasn't going to animate it, otherwise I would have just created the effect on a black background. haha So after the animation was baked on the geometry, I created the lava textures you see, since the rig was originally all Lambert Grey. After that I added a fluid container and started working on creating the effects of the fire. Again I am not a VFX artist, so unfortunately I don't remember all the details and sliders that I messed with, in order to get this effect looking like it does. But over all I think it looked pretty okay...except for that black halo that shows the bounding box for the fluid container. But alas, it is what it is.


For the second part of the class we had to create the effect of smoke. I wasn't really sure what I wanted to do for it, but I knew that we had to use the node-based program SideFX Houdini. I will say that I can appreciate what SideFX Houdini can do, but it was not fun for me to learn everything it has to offer. To me I thought that it was too complex of a way to about things, and I didn't enjoy my time in it as much as I probably should have...but, what can you do? you can't win them all. As far as what's happening, I guess I should at least explain that a bit. When I was in Maya I was able to animate bake on the animation to the Geo, and have the lava texture, but when I tried importing everything into Houdini things started to fall apart. It took me far too long to get the Rig into Houdini, and not have it freak out, but once I got it working I could finally get the smoke effect to work with the rig. Overall it was a hassle and a half, but in a way it was sort of rewarding........No, who am I kidding, I was super frustrated.

Overall I had some resemblance of fun in Visual Effects 2, but I wish that I understood, or wanted to understand the Visual Effects side of CG more.

Thursday, November 20, 2014

Character Animation 2: Character Acting

Oh man, where do I start for this post. I was really excited for one class that I had in the month, character Animation 2. In my time at Full Sail I have had the pleasure of taking 3 other different Animation classes, 2D Animation, Fundamentals of Animation, Character Animation 1. Each oth those classes have taught us more and more about the principles of animation and how to refine our skills further and further. For Character Animation 2 we had two different projects to work throughout the 4 weeks, a Pantomime and a Sound Clip.

For the Pantomime we had to tell a story, and show two different emotional shifts, throughout the Animation. For my pantomime I choose to tell the story of a young boy that is walking happily, with his balloon, and ends up loosing it due to a gust of wind.

For the Second project I we had to choose a sound clip from a sound clip library and animate our character according to the clip.

Pantomime Project: Final Submission


There was a lot that I could have done better in this animation, but overall it came out pretty much the way that i wanted. I tried to get the emotion of a younger boy that lost his balloon to the wind, and that child like innocence of losing the thing that is important to them.

Sound Clip Project: Blocking 


The first layout of the Sound clip animation. Everything is very rough, in order to get the timing and feel of the overall animation.

Sound Clip Project: 2nd Pass


This was my first run through after the initial blocking stage. Everything feels really floaty right now, because I was in too much of a rush to get out of the blocking stage. I could have benefited from staying longer and adding anticipations and holds.

Sound Clip Project: 3rd Pass 


On this pass I've really pushed the animation to its next level. I added more anticipations, moving holds, and refined the downward point to make the emotion translate through the action.

Sound Clip Project: Final


This was my final go through of the sound clip animation. Here I added in the final mouth shapes, in order to get the character to look as though he was speaking the words. Last minute animation fixes, and the quick and dirty render to finish off this project.

Overall I loved this Character Animation class, the teacher was extremely helpful, and always willing to help people with one-on-one critiques. The further I get through my degree the more I appreciate all the hard work, and dedication to Animation. I hope to continue animating characters and creatures and further refine my skills.

Wednesday, October 22, 2014

Visual Development: Shading, Lighting, and Texturing

October, the month of everything spooky and scary. In this month I had two classes to work my way through, one being Visual Development, the other being Motion Capture. This post is going to focus only on my Visual Development class, and the things that I learned during my time here.

Now just to give you guys a little history I am not a very technical person. At all. End of story. I don't like looking at the minute details of a project and often overlook small parts that snowball towards the end. My philosophy has been, "as long as it looks good" and even though I could point out every possible thing that is wrong with that way of thinking, it's still part of my belief. The reason why I'm saying this is because I wanted you to know where I'm coming from when writing this, and the struggles I went through trying to complete each project. In the end we had 2 main projects scenes, all of which took multiple days to complete and one of which counted as our final project.

Project 1
 This was the first project that we had worked on. This scene was provided to us, with all the geometry in place, and we were tasked with matching the original lighting in the Reference photo. This was a good way to teach us the power of the lighting system in Maya, and how it can add to a scene without ever needing to texture anything. Oh yeah, did I mention that all the geometry has a Lambert texture on it? Because, yeah it does haha.

Project 2
Look at this picture.....look at it. Okay you got it in your head? Good haha This was the scene we were working on for the rest of the month. We had to break it down the project into a bunch of different parts. We learned about UV's, Texture Projections, Reflections, Refractions, and Compositing. I'll try to break it down to each piece, but I may not have all the files to show off. 

UV's
Like I had mentioned, the first part of the project was to UV the Scrapper, and texture it in photoshop. This was the one that I did. I know it's a little hard to see the details with the UV layout over everything, but all the details are there. Trust me.

Texture Projection
After we got the Scrapper all worked out, we had to move on to the box and work a lot more in the Hypershade than I am, or was, comfortable with. There were so many nodes to work with, all intersecting each other in haphazard ways that made my head spin. The only other Node-based system I had worked with before was Nuke8, but even that was a much more intuitive to me than the Hypershade. Though I did get it all worked out in the end.

Reflections and Refractions
Next up was getting the bottle to actually LOOK like a bottle. We had to learn about how the MIA_material worked and how it reacted to the lights in the scene. Of course we used some of the other skills to spice up the bottle, and make it our own creation. I choose to replicate Slurm soda, from Futurama...as you'll see is sort of my "theme" for this project.

Scene Finishing
And here it is everyone. This is everything put together, and rendered out. Here you can see how my Scrapper, and Box ended up and see the theme that I had stuck with.

Compositing
After everything set and looking about the way that we wanted it, we learned about rendering out all our different passes, and bringing it into Nuke. Here we had to adjust our scene in order to fix the lighting. Nothing too special here, just basic Nuke.

Overall this class was a lot of fun, and the teacher Jared Edwards was very helpful in not only teaching us the materials we needed for the projects, but also for our own personal work. Even though I wont ever be a shading and lighting artist I liked everything that we learned.

Drawing: Cartoonified

Hello all, I'm back again and today I have another personal project to share with you. This is a very quick digital drawing I started at 3am haha. I seem to have a problem with gaining a new found boost of energy and inspiration at those late night hours. My friends call it the "Night Owl Syndrome", but whatever it's called it's what I have.

So as I stated I started working on a small project that may actually be part of a "Rebranding" of sorts. I don't know yet, but in any case it was a fun project that I got done in a few hours. 

This was the first rough draft of the character pose, and proportions. Most of the features of the character are here, but I still ended up adjusting some of the final points in the next cleanup.

This was the second wave of the character. I like to use this second draft as pre-cleanup. Even though most everything looks fairly good, and most wouldn't know the difference, I like to see it to see if all the "clean" lines work well together, before finalizing the lines.


I have to say, for the final product I am fairly happy with it. Of course there are things that could definitely been done better, but...whatever haha  

All in all this was just a quick distraction that I really wanted to do. It's nice to stray away from school work, every once in awhile, in order to fuel my creativity, and not get burnt out. So look forward to some more quick projects!

Sunday, October 19, 2014

Digital Tutors Member

Wow today is a great day. My mother decided that I could get my Christmas present early this year. As of this day I am now a Digital Tutors Plus member. Now I have more ways than ever to learn about the Computer Animation world, with all of their different training videos on the programs that I have been learning.

I know it may not seem like it means all that much to some people reading this, but to me it means the world. Please dont get me wrong when I say this but Full Sail University has it's faults in it's way of teaching. That major fault is that you only have a ONE MONTH to to learn each aspect of each of your classes. To some of you it may seem ludicrous to learn a class in one months time, and to others it may not seem like it's not that big of a deal, but there is one other thing I would like to remind all of you reading. The one month period, that I have to learn in, is split up between two different classes. Meaning that at MOST I only have 15 days to attend EACH of my classes for the month. I don't think anyone can teach, let alone learn, all of the aspects of modeling, animating, texturing, ect. in only that amount of time.

Basically the point of this post was to say that today I am a Digital Tutors Member, and I'm really excited!

Tuesday, October 14, 2014

Modeling: Low Poly Fun

Looking back at my last few posts I noticed that I started off two of them with the phrase "Well now" and as tempting as it was to continue the tradition, I know that I need to up my vocabulary and try to branch out and use big boy words.

This month, after talking with a few of my friends, I tried my hand at a fun new project. Just to give you a little info, here at school there are two similar degree programs Game Art, and Computer Animation. The main difference between the two programs is that Computer Animation (which I'm enrolled in) focuses on high poly counts, and replicating realism, whereas Game Art (that my friend used to be part of) focuses on lower poly counts and replicating the art style. After talking with them, and doing some research I was interested in making what is called Low Poly Art.

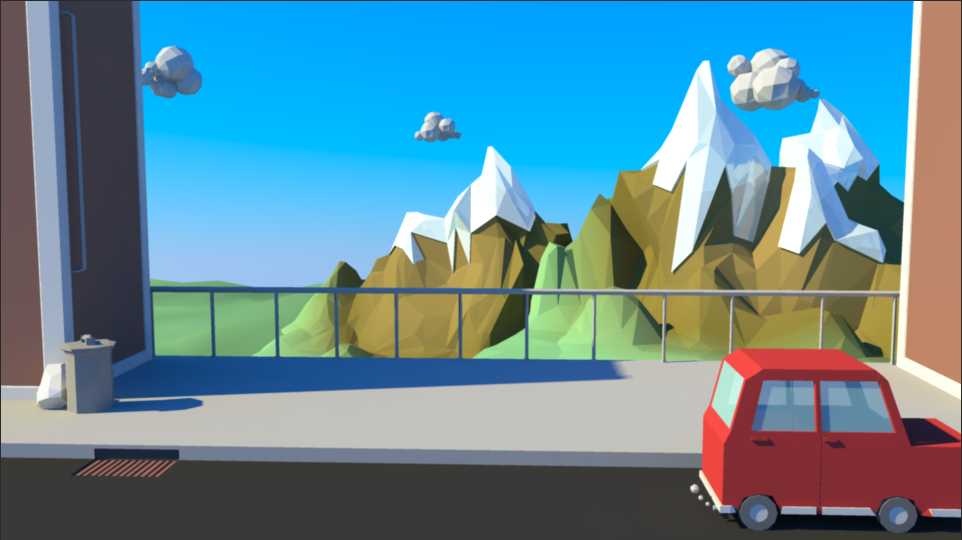
Without further ado, here is the project that I was working on. Keep in mind, it is a LOW POLYGON PIECE, meaning you are supposed to see each individual face.


This is the original concept drawing. Here you can see the original vision that I was trying to replicate.


Above is the first thing I wanted to get done. This character was originally going to be one of the main focuses of the scene, but I think I have recently gotten away from that mindset. We will see how it turns out later. I still need to rig, and pose him....Maybe.


This is the progress after my second day of working on it. You I used Maya's Physical Sun and Sky to get the lighting I have.


Above is my thrid day of work. I added a car, clouds, and a few other details to the scene. I took out the sky, in order to test if I wanted to replace it in post.


On day 4 I started coloring the geometry and testing the different materials that would work. I choose to stick with simple lambert materials. I think it worked well with the lighting that was present.

This is where I currently am for this scene. I added some more things to the scene, most notably the Ice Caps to the mountains. I felt that if it was a nice touch, that added A LOT to the scene.

Well that's all I have for the moment. I haven't been able to work on the scene all too much in the last few days, because of school. If you look at the original concept I had a black streaks in the sky, which are supposed to be giant birds, with long flowing tails, and that is what I am currently working on.

Friday, October 10, 2014

Chronicles of the Past: Part 3

Well now I would like to thank everyone for sticking with me so far, in this series of posts, but this will be the final entry in the Chronicles series. After this post I will be all caught up for my saved school work, and I will be able to post my newest work, and you'll be able to get live updates as I go through them.

As far as this post goes, i'm going to be covering two different classes, but fear not, this will be a rather short post. I don't have as many files that document my work over the course of the classes, so YAY! haha

Visual Effects 1


Alright I'm going to start off on my "strong foot" here, and show off my very first Visual Effects project. Unfortunately it was the only one that I was proud of, because it was the only one that I was able to render within the allotted time. For this assignment in particular we had to do a rigid body simulation using the Maya Dynamic system. I think it was a nice introduction to all the different tools that are presented for us, and taught me a lot about problem solving certain situations. We were provided the Maya scene, where all the Geometry was set up, and we had to implement the Dynamics in order to complete the Rube Goldberg machine. It was fun not only to work with, but to see how a lot of the effects could be used to create some of my favorite scenes from major films. I swear the more I learn about 3D the more I ruin the magic of movies haha

 I'll be honest with you I had a lot of fun learning about the Maya Dynamic system during that month, but I just wish I had more time to play with it... We only had around 4-6 days to complete each of our 3 assignments, and I don't feel like it was enough time to get everything done to the best of my ability, but it's Full Sail so what are you going to do? At least we have the pleasure of having Visual Effects 2 in a few months time!


Character Animation 1


Along with Visual Effects 1 I had to juggle going through Character Animation 1. This was not the first animation class I had gone through during my time here, I had Fundamentals of Animation a few months before. That class covered basics of the Graph Editor, and the Dope Sheet and trying to get us to implement the 12 Principles of Animation to our work. For Character Animation we focused on completing the Basic Walk Cycle. We had to to this twice throughout the whole month. The first dealing with just the legs of a human, and the other replicating everything we learned about the legs and adding in the upper torso to it. Above was my final walk cycle I submitted. There were a lot of new concepts that I learned throughout the month, like how to add Foot Roll, creating Anticipation, and plenty of others that I didn't learn in previous classes. 

Overall I think this class opened my eye to the fun of hand animation. I know a lot of people in my classes aren't fans of the animating process, but as of right now I think it's the path that I want to go down, for my Major. We will see if it changes, though I think it is unlikely at this moment. 

Well that's it for my "Chronicles of the Past" posts, now I will be all caught up with my current classes and can do updates on all the new things as I learn!

Thursday, October 9, 2014

Chronicles of the Past: Part 2

Welcome back, or hello if you are joining me for the very first time! Either way I'm happy you are found your way here and are taking the time to read through my posts. This is Part 2 of my Chronicles of the Past, where I talk about some of the classes that I have had during my time at Full Sail University. Last time I talked about my time in both my Traditional Art 1 and 2 classes. I wanted to separate those two classes, only because they were both Traditional focused, and although really fun and helpful, were not focused on the 3d portion of my degree. For this post I'm going to be focusing on one class in particular Production Modeling. I took this class twice, back in the time I thought I was going to focus on becoming a Modeler, so I have the most work to show off from those two months of classes. Just as a side note, most of the projects had to match a piece of Concept Art, we were given, but unfortunately  I don't have the artwork to post... Without further ado, let's jump into it!

Production Modeling (PRM) Round 1

So I'll keep it short for these descriptions, just so we can all keep somewhat sane throughout all of this. This one was called a the Dragon Tree. It was a funny piece that, although was a static tree, looked as though it was majestically walking through the landscape. I was VERY new to the program Zbrush at this point, and was constantly fighting the tools, in order to get the piece I desired.


This odd little creature was from yet another concept art, and again I was still very new to the program at this point. I was constantly trying to figure out what tools would give me the result I desired. It was not easy, at the time, to get the folds and wrinkles in the creatures skin, but I was proud of it... at the time.


I think this was my first real attempt at a full head, and like always I WAS fairly happy with it. The more I look back at it there are so many obvious things that I could have fixed, but I just skipped over during my production. Overall not bad but not good either. 5/10

Well that was pretty much it from my first time going through production Modeling. I liked the class a lot, and after I figured out it was going to be the last modeling class I would ever have at my time in Full Sail, I decided I wanted to take it again, and use that time to refine my skills. So now we jump to my work with Zbrush, after only one month of time in the program.

Production Modeling (PRM) Round 2

Yes, yes I know the picture says Anatomy Study #2, and you may be asking me where Anatomy study #1 is. Well all I have to say to that is that it was garbage! You don't want to see that (trust me you don't =P) you came here to see things that resembled art, not poop. I'm kidding, but honestly I wanted to showcase my progression and not just some random practice I did when I was bored.


Although I haven't been working in Zbrush at all this last month, this was one of the things that I made that has survived my constant need to purge my art folders. It is a very simple hand, that I use often append into full body meshes, and customize to fit the needs of the project. The hand is meant not to have a lot of detail in it, so that I wouldn't need to "fix" too much, just incase it was needed for something outside its intended use. (This hand was used in the above image)


This was probably the piece that I was most proud of. It's not too complex, and it didn't take too long to complete, but I LOVED the way it came out. I've always liked hard surface modeling more than organic, and I don't know why I choose to do so much organic modeling, while I was here, but I guess I wanted to step outside of my comfort zone for once. 

Well that's about it for my work from my Production Modeling class. In the end I'm glad that I went through the experiences that I did, at the times I did, otherwise I don't think I would be where I was today. I would probably do it all over again if I had the opportunity.

Look forward to the rest in my next and FINAL "Chronicles of the Past: Part 3" 

Chronicles of the Past: Part 1

Well now I think it's time to show my chops, and give you a little taste of what you'll be seeing on this blog. I have been attending school for over a year now, learning all different aspects of Computer Animation, from Modeling, to Rigging, Animating, Shading and Lighting, and even some Tradition all classes here and there. All of these skills have been important to me, and have only helped build up my knowledge to the vast world I have stepped in to.

WARNING: Longish post ahead

Unfortunately I don't have too much of my old work, from my time early on at Full Sail, and that makes me kind of sad, but I never would have thought that I would be starting this Blog a year ago. What I do have is work that I have done later on in my time at school, so there isn't really any way for me to show you where I started from... Let's just say it wasn't all too pretty haha

Art 1

So this was a piece that I did for my first Traditional art class at Full Sail, but not the first one I had ever taken. In the class we were tasked to make a two IDENTICAL characters, with the only difference between them being their colors. By changing the colors we were supposed to show how the color palette of characters can change the emotion that the character convey's to the audience. For the project I choose to make these Flower Girls (original I know haha), after a long, long line of pre-production. I cannot honestly tell you how long it took me to nail down an idea for this project, but I know that I had a few long nights debating over what to do.

This class was also my first introduction to Full Sail's famous 24 hour schedule, as I had classes that ended at 1am 3 days a week, and had 9am class on the other days. It was chaos, and my body didn't know how to react, but I have since gotten used to the craziness.

Art 2

The above piece was one that I did for my second Traditional art class. This assignment was a lot of fun, not just because I enjoyed working on the piece, but because of the the way that our teachers prepared us for the assignment. Just to give a little explanation we were told that we would have to option to choose from two different assignments, but it all fell under the guidelines for the same project. So for this project in particular, we were taken to the Zoo, and given a black 20 page sketch book, and were told that we have to fill up both the front and back of the book with animal and plant studies. It was a lot of fun to get to wander around the zoo with some of the friends, and study the animals and their habitats. We saw everything there, and I mean EVERYTHING! haha we left no stone unturned, and no animal house unvisited, but I have to say the most memorable thing I have from that trip was the reptile house. It was by far the single exhibit my friends and I stayed in for the longest. We were captivated by the snakes, lizards and frogs, and best of all we even got to watch the handlers feed the snakes. Man that was vicious!

Anyways, after our time at the zoo was done, and our sketchbooks were filled we had to make the choice if we wanted to come up with an creature, spliced together with at least three different animals, or an environment that one of the animals from the zoo could live in. Obviously I choose the latter. I've always had a soft spot for environments, and I wanted to make one special for all the reptiles that entertained me during my trip to the zoo, so I made a swamp land just for them <3

Look forward to the rest in my next "Chronicles of the Past: Part 2" 

First Official Post!

Hello everyone, my name is Jared Sneed and welcome to my blog. I am currently a student attending Full Sail University, studying Computer Animation. During my time here I have learned a lot about 3D software, focusing mostly using the software Maya, but also expanding into other things such as Zbrush, Nuke, Motion Builder, Cortex, Photoshop, and many more. 


I will mostly be updating this blog with my artwork, both from school and from my own personal projects. So come follow along as I delve into this wonderful world of Computer Animation!